| |
Fast Plants growing systems
are designed to:
- Be low-cost
- Provide continuous water
to the plants
- Alleviate weekend
watering
- Prevent water logging
- Be made from readily
accessible materials
There are three classroom
tested and recommended growing systems:
Bottle Growing System
- made from 20-24 oz. Plastic soda bottles
Film
Can Wick Pots and
Reservoir
Wisconsin
Fast Plants™ Growing System
Growing systems used by other
plants may work for Fast Plants. However, in order to be successful with
Fast Plants in the classroom, read the growing
instructions
fully and test the system prior to using it with your students.
Bottle
Growing System (BGS)
Construction and Planting
Instructions
The Bottle Growing System
(BGS) is a low-costs growing system. Made from recycled soda bottles this
system is simple, cheap, and accessible at all levels. The BGS is a
hydroponics system, wicking nutrients and water from the reservoir below.
Optimal planting density in is 6 plants in a 20-oz. soda bottle. BGS is
ideal for group and individual projects with Fast Plants.
Materials:
- 16-, 20-, or 24-oz. soda
bottles
- Unpolished cotton string
(20-cm lengths) or Watermat® for capillary wicks
- Vermiculite
(medium-grade horticultural)
- Planting medium (a
soilless mixture of approximately 1 part peat moss and 1 part
vermiculite, e.g. peatlite, or Scotts Redi Earth®)
- Peters 20-20-20
ProfessionalTM fertilizer with trace elements
- Fast Plants seeds (One
packet of 200 seeds should be sufficient for 24 bottles.)
Construction:

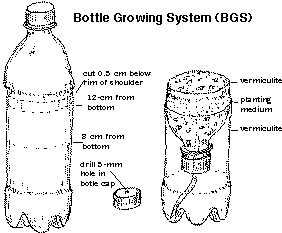
- Cut a soda bottle 0.5 cm
below the rim of the bottle shoulder to create the growing funnel,
which will hold the vermiculite and planting medium. Make a second cut
in the bottom portion of the bottle to create a reservoir, 8 to 12 cm
tall, for the water or hydroponics nutrient solution.
- Drill or melt a 5-mm
hole in the bottle cap. Screw bottle cap onto bottle top.
- Insert a string wick or
other capillary wicking, approximately 0.5 cm X 10 cm, through the
hole in the bottle cap. Check your wick before planting to be sure
that it draws water well.
- Invert the growing
funnel (bottle top) and place in the reservoir (bottle base). The wick
should extend from the funnel to the floor of the reservoir.
Planting
- Layer approximately 50
cc (~1/4 cup) of vermiculite into the funnel and then layer
approximately 100 cc (~1/2 cup) of your planting medium soil on top of
the vermiculite so that it fills the funnel to the rim. Tap the funnel
to help the soil settle loosely, then level off the excess. Do not
press or compact the soil.
- Gently soak the soil and
vermiculite with tap water, letting it percolate through the soil
until it drips from the wick at the bottom of the growing funnel. The
layer of soil should shrink down in the funnel about 0.5-1.0 cm from
the rim.
- Uniformly distribute 8
Fast Plants seeds (or desired number of seeds) on the surface of the
moist planting medium. Plant around the perimeter of the funnel about
5 mm from the bottle edge.
- Cover the seeds and
planting medium with a layer of vermiculite (0.5-1 cm) so that the
vermiculite is level with the rim of the growing funnel. (Do not
compact the vermiculite.)
- Gently moisten the
vermiculite with tap water until water again drips from the wick at
the base of the funnel.
- Pour off the water
remaining in the reservoir, and replace it with 1/8 strength Peters
Professional fertilizer (hydroponic nutrient solution) to the
level of the bottle cap.
- Make a full strength (or
"1X") Peters solution by dissolving one level soda-bottle
capful of Peters crystals into one liter of water. Then dilute a
portion of the full-strength solution to 1/8X for your hydroponic
nutrient solution. (For every cup of full-strength solution, add 7
cups of water, and then mix well.)
- Place a label on the
completed BGS indicating the date of planting, variety of seed (e.g.
Basic or Petite), and name of the student or group.
- Put all BGS's under high
intensity fluorescent light for 24 hours a day and follow
growing instructions.
Film
Can Wick Pots
Construction and Planting Instructions
Film can wick pots are ideal
for low-costs experiments that require measurement or isolation of single
plants. The film can wick pots are placed on top of a water resevoir for
continuous watering. Recycled film cans are often available from local
camera shops and other film processing stores at no cost.

Materials:
- Black plastic film cans
- Forceps
- 4 cm long wicks (diamond
wicks available from Carolina Biological Supply Company,
WaterMatTM material, or felt from a fabric store)
- 10 cm squared piece of
WaterMatTM (piece of felt or WaterMatTM large enough to cover the top
of your reservoir and a piece to hang down to the bottom of the
reservoir.)
- Recommended soil
and vermiculite
- Water reservoir (1/4lb
and 1/2lb deli containters work well)
Construction - Prepare wick
pots for planting.
- Drill or melt an
approximately 0.5 mm diameter hole in the bottom of each of the film
cans.
- Use a 5 cm length piece
of wicking material to wick each film can pot. It is easiest to insert
the wick by grasping the piece at its center with a pair of forceps
and inserting the wick into the hole in the bottom of the can.
Note: Be sure to wet
the wick thoroughly before positioning it in the pot in order to break the
surface tension and allow for capillary action.
Planting
- Fill the film cans with
slightly moistened commercial peat/vermiculite soil such as Jiffy Mix®
or Scotts Redi-earth®. Fertilizer: if you are using NPK
(20-20-20) slow release fertilizer pellets, fill the wick pots half
full with soil mix and add 3-4 fertilizer pellets for 1-2 plants in
the film can at maturity. (If you are planning to grow hydroponically
with Peters Professional® fertilizer, fill the film cans with only
the soil mix.) Fill the rest of the wick pot with the soil mixture
while tapping the side of the can to help settle the soil. Do not
press down on the soil.
- Gently water from above
until the wick drips. The soil will recede from the top of the can
about 5mm. Place additional soil mixture to fill the canister to the
top and rewater.
- Plant four seeds by
carefully placing them on the surface of the soil. Do not push the
seeds down into the soil.
- Gently cover the seeds
with a thin layer of vermiculite.
- Water from the top again
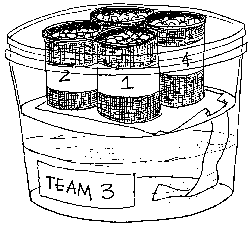
and place the wick pots on the wicking mat of your Fast Plants
reservoir(s). Be sure that wicks are touching the wicking mat.
- Plants should be grown
under standard Fast Plants lighting 24 hr/day, with the growing
tips of the plants 5-10 cm from the lights at all stages of the life
cycle.
Note: Film can wick
pots are more stable when kept in "clusters" of 3 or 7 pots. Use
2 strong rubberbands, one near the rim of the cans and one near the
bottom, to secure them.
(CAROLINA GROWING SYSTEM)
The
Wisconsin Fast Plants™ Growing System
The growing system
components provided by Carolina Biological Supply Company, include
everything you need in order to successfully grow Fast Plants, except for
the lighting system. Unless otherwise specified, Classroom Kits are
designed for use by up to 32 students working in pairs. Planting and
growing instructions for the Wisconsin Fast Plants Kits™ are provided
with purchase.
The following materials are
included in the growing system:
- Fast Plants seeds,
rapid-cycling Brassica rapa (Rbr). Seeds are small and have to
be handled with care.
- Quads - 4-celled
planting units in which you will grow one plant to maturity in each
cell.
- Potting mix and
vermiculite
- Diamond wicks - conduct
water from water mat to soil in cell of quad.
- Water mat - conducts
water from reservoir to wicks.
- Fertilizer pellets -
slow-release source of nitrogen (N), phosphorus (P) and potassium (K).
Pellets are larger than the seeds.
- Plant labels - to record
student name, planting date and experiment.
- Pipet - to water cells
from above when necessary.
- Dried honeybees - to
make beesticks for pollinating.
- Algae-squares (tinged
blue) - contain copper sulfate to prevent algae growth in reservoir.
- Water reservoir
- Wooden stakes and
plastic support rings - to support the plants if necessary.
|
![]()